Wednesday, November 24, 2010

Unity WEDNESDAY Hip Hop! Yep, a day early!

Since Thanksgiving is tomorrow we are having our Unity Stamp Co. Blog Hop today instead.

Today's fun release is another wonderful Co-Branding release. This time it's Bella Blvd! Make sure you head over to the Unity blog or website to see all the fab designs!


I used the last one (Bella Trees) for this gift bag.


Supplies:
Kraft Bag: Craft Store
Patterned Papers: BoBunny Press
Die: Spellbinders
Twine: JIllibean Soup
Punch: Stampin' Up!
Ink: Ranger

And There's More! ..............

***Special Note ***
We are donating $.50 cents of every sale to the LOCAL FOODSHELF!

Now back to the Unity blog if you didn't start there so you can Hop through all the design team blogs. 
If you're ready to move along then on to Christi's blog for more inspiration. 

Next Blog
Have a good one!
-kimber

Saturday, November 20, 2010

Unity Co-Branded Stamps now available at UNITY!

Have you had your eye on some of the great new Co-Branded stamps and couldn't find them at your favorite store? Now you can pick them up straight from Unity. The best part of this... THEY ARE ON SALE right now! ;)

Today many of the design team members have loaded up samples using some of the Co-Branded stamps that Unity makes. Head over to the blog to see a list of who has some great samples up on their blogs.

Here are a few I have done in the past:

Cosmo Cricket

Cosmo Cricket

Samantha Walker

 Donna Downey

Donna Downey

Donna Downey

Donna Downey

Donna Downey

Jillibean Soup

Jillibean Soup

Jillibean Soup

Jillibean Soup

Thanks for popping by today!
Have a great weekend!
-kimber

Thursday, November 18, 2010

Unity Thursday! Hip Hop!

Before I get started... Did you see all the incredible stuff going down at Unity lately? Tons of co-branding with the hottest companies out there plus (what I think) is the best part... YOU CAN BUY ANY AND ALL UNITY STAMPS DIRECT FROM UNITY NOW!!!! Plus you can always count on them for SOME sort of deal so make sure you hit the Unity blog to see what's on sale and get shopping!

Ok, so today's themes were either making ornaments or a kids craft. I went with the kids craft route.
I made a little coloring book to toss in my purse that will be my secret weapon when the kids get antsy while we run errands during the holiday season.

All I did was grab a handful of my past kits and white cardstock. Then I stamped away on 4x5" of white cardstock with black ink. Finally, I made a simple cover and back from chipboard and bound it with a small binder ring. SO simple. I always have a small bag of crayons in my purse anyways to keep the kids occupied at restaurants so this will be a perfect addition.


Supplies:
Cardstock: Bazzill
Patterned paper, button, twine: Jillibean Soup
Stamps: Unity Stamp Company
Ink: Memento
Punch: Stampin' Up!


Now back to the Unity blog if you didn't start there so you can Hop through all the design team blogs. 
If you're ready to move along then on to Christi's blog for more inspiration. 

Next Blog
Have a good one!
-kimber

Thursday, November 11, 2010

Unity Thursday! Hip Hop! -- December Daily style

Happy Thursday Blog Hoppers!

Today's hop theme is 'Journal Your Christmas' ie. December Daily albums. I love the idea of the December Daily album. Create the bones of an album and then in the month of December when life gets crazy all you have to do is snap a photo a day and jot down a note about what you did that day.

It took me all of an hour to create the bones of my December Daily album. I used the Unity Stamp Company December Kit of the Month and a $4 mini album from Target.


The cover was stamped with the sentiment stamp from the Nov '10 KOTM using white pigment ink. Then I added some Imaginisce gems with the I-Rock and tied a ribbon around the rubber band that keeps the book closed. 

For the cover page I used 2 different older Unity Stamp Sets (but good basics to have!)


The inside pages are all the same. On the right I cut 4x6 pieces of white cardstock and stamped 'Picture Perfect' with the Nov '10 KOTM.
On the left side I cut 4x6 pieces of white cardstock and stamped Just a note and the poinsettia image. 
The plan is to make a note on the left and then I can add the photos on the right.
How simple is this?! Seriously!

Now back to the Unity blog if you didn't start there so you can Hop through all the design team blogs. 
If you're ready to move along then on to Christi's blog for more inspiration. 

Next Blog
Have a good one!
-kimber

Wednesday, November 10, 2010

A gift and A card

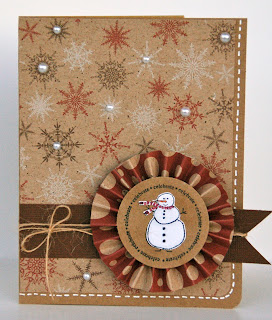
This is my week on the Scrapbook & Cards Today blog and I decided to finally break out the i-top and i-rock that have been sitting here staring me down. The i-top is such a fun tool since you can customize your project so very easily. I used the i-top magnet buddies to create a little snowman magnet set to include with a holiday card.

Supplies:
Cardstock: Core'dinations
Pattern Paper: Imaginisce and Jillibean Soup
Gems: Imaginisce
Stamp: Imaginise
Ink: Memento
Punch: Stampin' Up!
Embossing Folder: Cuttlebug
Twine: Jillibean Soup
Acrylic Snow Flake: Imaginise


So today I have a step out over on the SCT blog showing exactly how to use the i-top. It is really fairly simple. The snowman magnets were the 1st thing I had created with with it. Now I want to seek out some of the new i-top buddies that Imaginisce has released. They have brads, buttons, magnets, pins, twist daddies (you create the top with the twist daddies and then they twist on to accessories), alligator clips for the twist daddies, bobby pins for the twist daddies, rings for the twist daddies and headbands for the twist daddies. SO many cool options.

Here's the step out on how to create the magnet above:

To get started, use the i-top punches to punch out a small, medium and large toppers from white cardstock.

Next emboss the punched white circles by placing the 3 pieces into an embossing folder to add a bit of texture to the toppers. I used swiss dots for my sample.

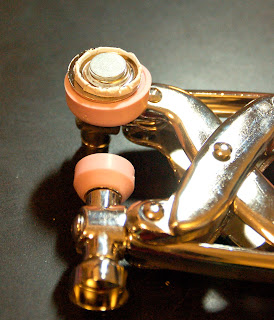
Following the instructions on how to use the i-top, place the metal topper piece on the metal post, slide the punched topper between the pink rubber cup and the top of the metal topper piece.

After the punched paper topper is centered give the i-top tool a squeeze.

Turn the rubber cup piece to the side and press the tabs into the center of the metal topper piece.

Now prepare the base piece of the magnet. The magnet and the metal base come separate as shown.

Place the magnet on the raised center side as shown.

Put the assembled magnet base in the metal cup of the i-top and swing it towards the pink rubber side.

Squeeze the tool to place the metal base into the covered top. Using your fingers, gently press around the sides of the pink rubber end of the tool to help finish crimping the top to the bottom.

Swing the pink rubber end of the tool out and peel back the pink rubber lip to release the finished magnet. 

To assemble the card, after creating your card front lay the 3 magnet pieces on the front.

Slide the magnets on the inside of the card (back of the card front) to hold the magnets in place on the front. The magnets are very strong and held well through 2 pieces of heavy weight cardstock easily.

The i-rock is so easy it's crazy. Simply place the Imaginisce i-rock gems where you want them on your card. Turn on the i-rock to allow it to warm up for a few seconds and then place the top of the i-rock to the top of the gem until you feel the glue melt on the bottom of the gem. You will feel the gem slide a bit when the glue liquifies.


Have a good one!
-kimber

Thursday, November 04, 2010

Unity Thursday! Hip Hop!

We've got a bit of a Thanksgiving theme going on today if you haven't noticed. Thanksgiving table decor to be specific. This year we are going to our very good friends' home for dinner and I will of course be bringing a bottle of wine. ;) So I went ahead and decked out a bottle of white wine and a little note card for our kind hostess.  This was BEYOND easy to create. I used the Simple Blessings set and a few fall colored inks.

Supplies:
Cardstock: Kraft (Jillibean Soup), White (Core'dinations)
Stamps: Unity Stamp Co-Simple Blessings
Ink: Stampin' Up! and Colorbox
Gems: Zva Creative
Twine: Jillibean Soup
Punch: EK Success

Now back to the Unity blog if you didn't start there so you can Hop through all the design team blogs. 
If you're ready to move along then on to Christi's blog for more inspiration. 

Next Blog
Have a good one!
-kimber